SHUT THE FRONT DOOR:
Welcome in new friends and neighbors with an inviting entryway.
Time for project completion: 10 hours
Project level: Easy
Supplies:
1 Purdy syntox paintbrush, Sherwin-Williams, $20.79 • 2 quarts (1 for trim and 1 for door)of Exceptional Moisture Resistance exterior acrylic latex paint, Sherwin-Williams, $25.19 • Krud Kutter Gloss-Off prepaint surface preparation, Sherwin-Williams, $7.49 • Rust-oleum metallic paint and primer, Lowe’s, $8 • Allen and Roth No. 0198671 light fixture, Lowe’s, $106 • Ceiling medallion, Lowe’s, $13.50 • Recessed lighting sleeve, AC Wiring, $20 • Vinyl door letters, Fast Signs, $26 • Door swag, S. Stewart Home, $45
Tools:
sandpaper • electric sander • putty knife • razorblade • steel wool • old shoe brush • popsicle stick or credit card
Total investment
Door and hardware: $86.66
Lighting and décor: $210.50
TOTAL: $297.16
How to:
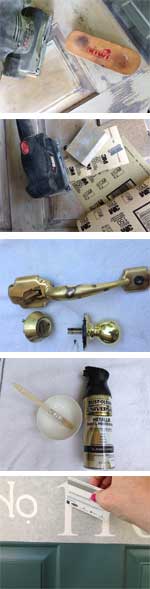 Step 1: Remove door from its hinges, and take off any hardware.
Step 2: Strip the door of any old paint or finishing by peeling off the layers using a putty knife. Sand the door with an electric sander or traditional sandpaper, whichever you prefer. Once the door is smooth, brush off excess dust with an old shoe brush. Prepare the surface to paint by cleaning it off with the paint surface preparation cleaner. Let dry. Note: Michele suggests having an old shoe brush handy for all DIY projects. It’s her favorite tool to use!
Step 3: While the door is drying, paint the exterior trim around the door opening with a fresh coat of paint. Michele chose Greek Villa No. 7551 for her trim shade. Note: If you have windows around your door that get paint on them, you can use a razor to remove paint from the glass or the cracks.
Step 4: Paint the door using the exterior pain. Michele chose Riverway No. 6222 for her door color thanks to the help of Rachel at Sherwin-Williams. She painted two coats on her door.
Step 5: While the door is drying, clean off the old hardware using the Krud Kutter Gloss-Off. With a steel wool pad, rough up the hardware so the new paint adheres to it.
Step 6: Spray the hardware with Rust-oleum paint and primer in one to give it a new look and feel. Michele chose oil-rubbed bronze to complement her grayish blue paint color.
Step 7: When the door and hardware are dry, hang the door back up on the hinges, and reattach the freshly painted hardware.
Step 8: To adhere the vinyl signs, you will need a popsicle stick or credit card. When ordering the letters, Fast Signs will ask you to measure the space so the letters and numbers are proportional. Line up where you would like the numbers on your door, peel off the backing and adhere the letters. Using the popsicle stick or credit card, rub over the letters and numbers to ensure they stick.
Extras:
• Michele suggests swapping out recessed lighting that is usually installed in covered entryways with a fun light fixture. She chose the Allen and Roth No. 0198671 light fixture to make a statement. She also suggests adding a medallion to the fixture on the ceiling. “It adds a special touch for little cost,” she says. She enlisted the help of Aaron B. Clapp at AC Wiring for her electrical needs.
• There’s nothing more inviting than a wreath to spruce up a plain door or add a festive touch around the holidays. Michele scored this beautiful wreath from S. Stewart Home.
• For extra lighting at nighttime, Michele used a globe light from an old light fixture inside her oversized lantern.
A special thank you to:
Aaron B. Clapp at AC Wiring
BJ Hunter at Fast Signs
Bev Reid at S. Stewart Home
Tony Hirner and Rachel Siefert at Sherwin-Williams
Jesse Thopmson at Lowes
Product sponsor: Sherwin-Williams Paint
![]()