
Cottage Paint transforms this junk store furniture into a one-of-a-kind treasure.
Project level:
Intermediate
Materials needed:
• Quart of Cottage Paint
• Antique glaze
• New hardware
• Wallpaper
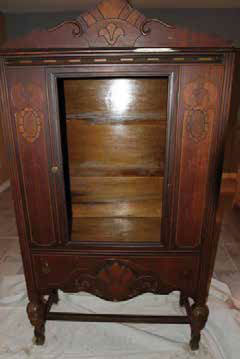
I purchased this piece of furniture from a junk store and loved it because it had great bones. It wasn’t in the best of condition, but I knew it would be something fabulous when painted with Cottage Paint purchased at Johnston Paint & Decorating. I’ve been using Annie Sloan Chalk Paint for more than three years and really wanted to try this paint because of the great review and the fact I could purchase it locally.
I definitely found a great product and will continue to be a fan. Don’t be afraid of it, and be sure to talk to Vicki Eultgen, designer at Johnston, as she can direct you on the many uses of Cottage Paint.
You can purchase Cottage Paint in pretinted or a tintable base. I chose one that they stocked, Crème Brule, which is a creamy offwhite. It took one quart of paint to cover this piece, including the inside. They have several samples at Johnston Paint, and the staff is very helpful. This water-based clay paint requires no sanding or priming and will adhere to most surfaces. In my case, this piece was wood and veneer, and the paint worked great.
First I cleaned the furniture with a damp cloth and TSP as it was really dirty. Your piece should be completely cleaned up prior to painting. I then proceeded to paint two coats of the Cottage Paint, allowing one hour to dry between coats. The second coat of paint I thinned down with a little water. Keep in mind, the first coat doesn’t need to completely cover the wood, but the second coat does.
I allowed the second coat to dry for 24 hours before I distressed the piece. I used a damp cloth to rub off the paint, which allowed the detail to show. The longer you leave it to dry, the more elbow grease you’ll need to use to remove it and give it the distressed look. You can leave it as is, but I like to make the detail show by distressing. You can use a damp rag to rub off the paint to show the wood.
This water-based clay paint requires no sanding or priming and will adhere to most surfaces. In my case, this piece was wood and veneer, and the paint worked great.
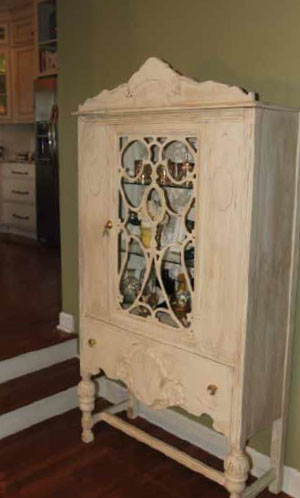
There are several options with the Cottage Paint to seal it. On this piece I chose the antique glaze in Umber. This product was easily applied with a paintbrush and then removed with a clean damp sponge until I got the desired look. This antique glaze sealed the paint.
I had some leftover wallpaper from a previous product and chose to put that in the back of the cabinet. I tried several different looks, such as fabric and wrapping paper, before I landed on this wallpaper. I love the way it looks. I also purchased new hardware from Hobby Lobby.
The total cost of the project was $55 for the cabinet, $35 for the quart of Cottage Paint, $18 for the antique glaze (of which I have plenty left for my next project) and $12 for the hardware.
Johnston Paint & Decorating
3409 Buttonwood Drive, Columbia, MO 65201
573-443-8755
[email protected]