Readers Share the Best of Their DIY
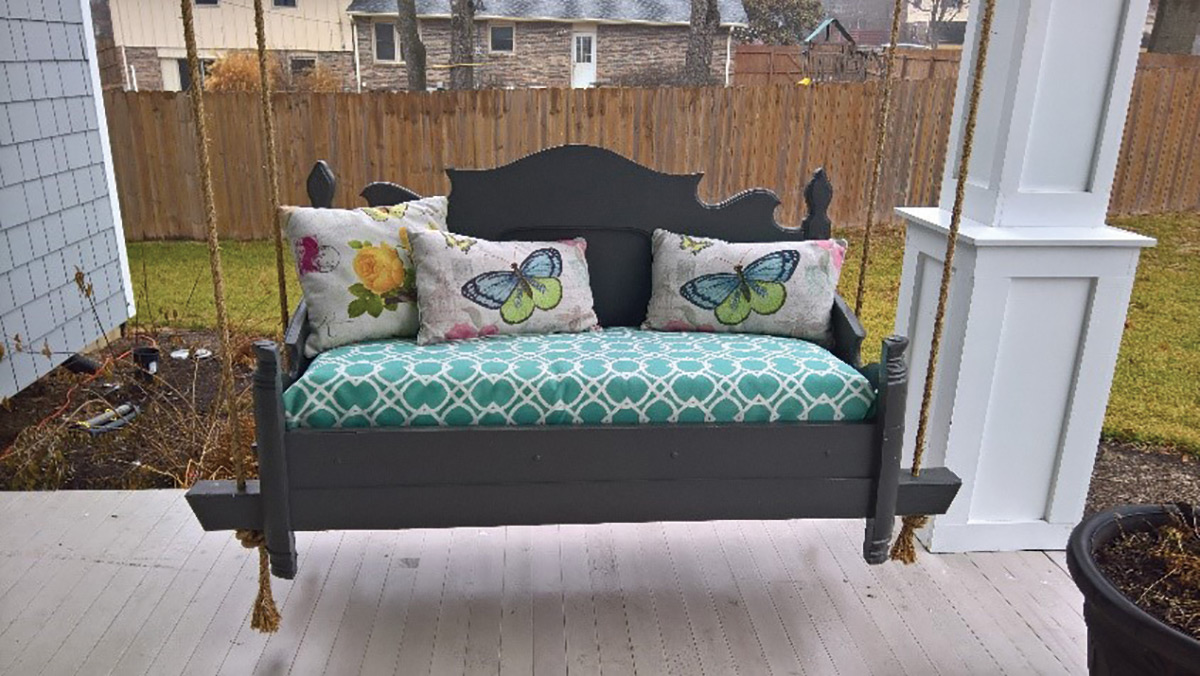
Porch Swing – Josie Mickey
Porch swings are one of my favorite things. My admiration stems from time spent swinging on the porch with my pappy in Biglerville, Pennsylvania, watching the rare car drive by his house. Since then, swings have been part of my home.
When my dreams for a new house became a reality, I knew my front porch yearned for a swing. The traditional, overpriced swing wasn’t going to work. I wanted something between a traditional swing and the expansive swing bed that has become so popular.
Thanks to my construction-savvy husband, we took an old walnut bed frame ($10.00 at a garage sale) and turned it into a perfect-sized porch swing. Relaxing with my family is now a true joy. Maybe someday I’ll swing with my grandchildren and continue the tradition I started with my pappy.
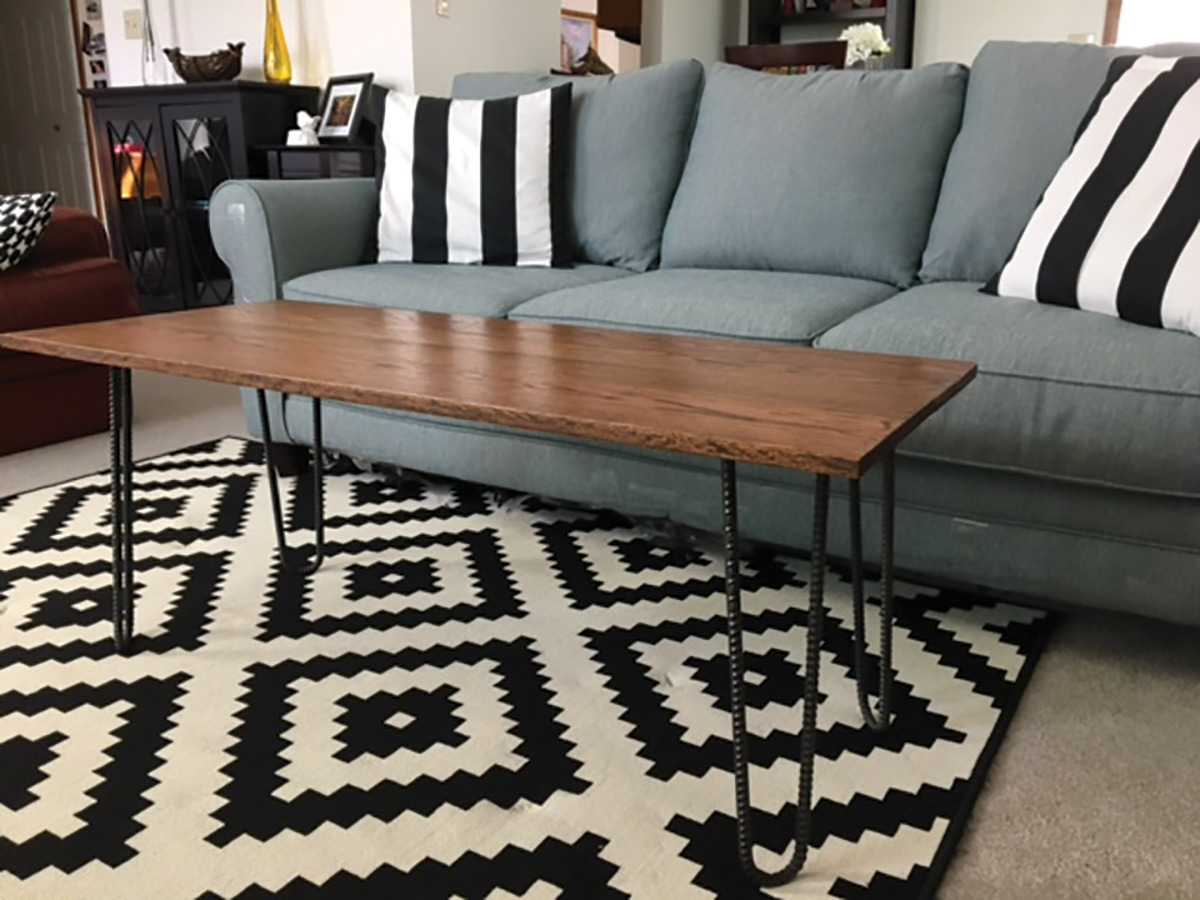
Coffee Table – Jackie Floyd
I wanted a new coffee table but didn’t want to break the bank, so I decided to make my own.
I enlisted the help of my grandpa, who is skilled with woodworking tools. First, I measured the height and length of my couch. I got three four-foot oak boards, and my grandpa used a biscuit joiner to cut the slots and add biscuits between each board to create a level surface. We used wood glue and clamps to glue the entire table top together and left the clamps on for 48 hours. Then we sanded the top and stained the wood, and I added a clear-coat spray paint finish, which was light and left the wood looking natural. Referencing the couch height measurements, I ordered the rebar legs from an online store.
Altogether, the project cost $100, and I love my trendy new coffee table and the memories with my grandpa.
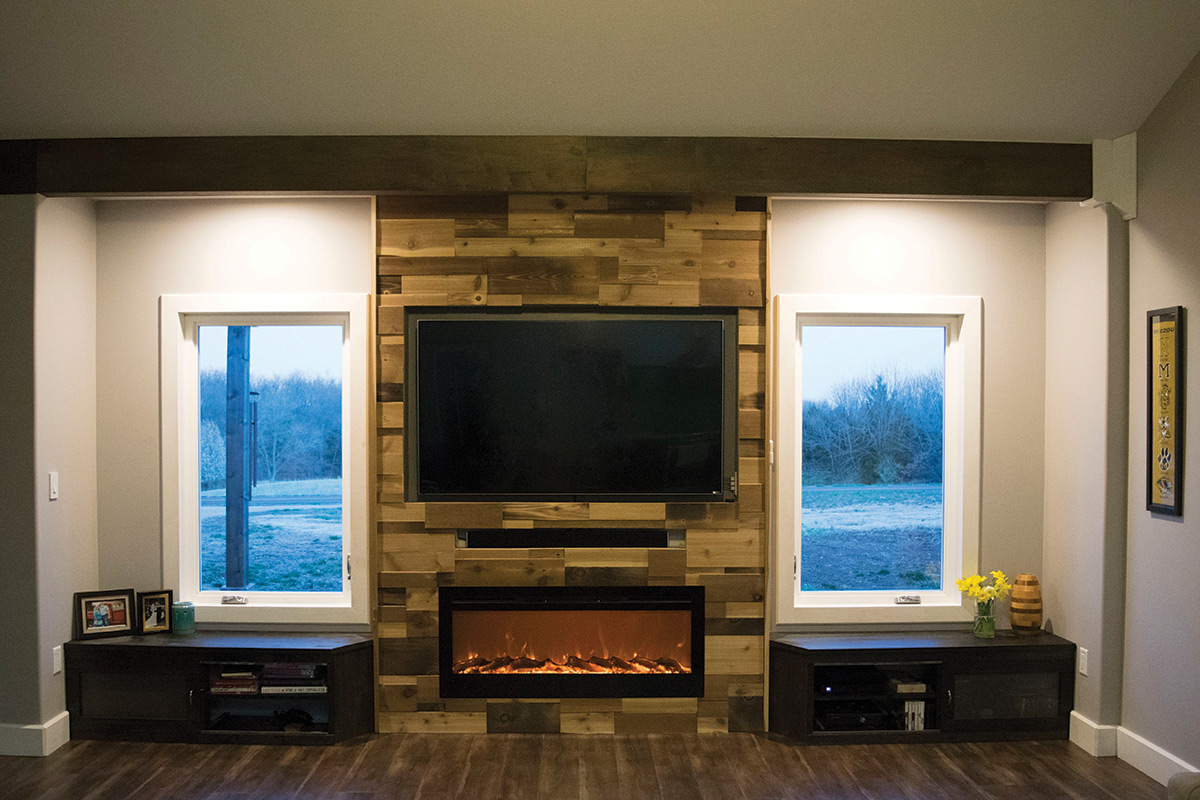
Media Wall – Marie Newell
When building our house, we wanted a knock-out centerpiece for the living room, so we decided to build out a “media wall.” We started by framing the area against our exterior wall, between our large front windows and running electric. Drywall, tape, and mud, followed by paint, moved it closer to completion.
Next, we picked a unique covering that would both stand out and visually mesh with the style of the rest of the house. We had leftover cedar scraps from other projects and wanted to save money, so we toasted a few boards over a bonfire to get a nice dark char on them and cut each piece as we went. We worked from the top, then trimmed the left and right sides with whole cedar boards and finished the flooring.
The TV, sound bar, and electric fireplace finish out this scrappy knock-out media wall, which is a unique conversation starter for all who come over. We loved it so much we ended up using the same technique on the back of our kitchen cabinets!
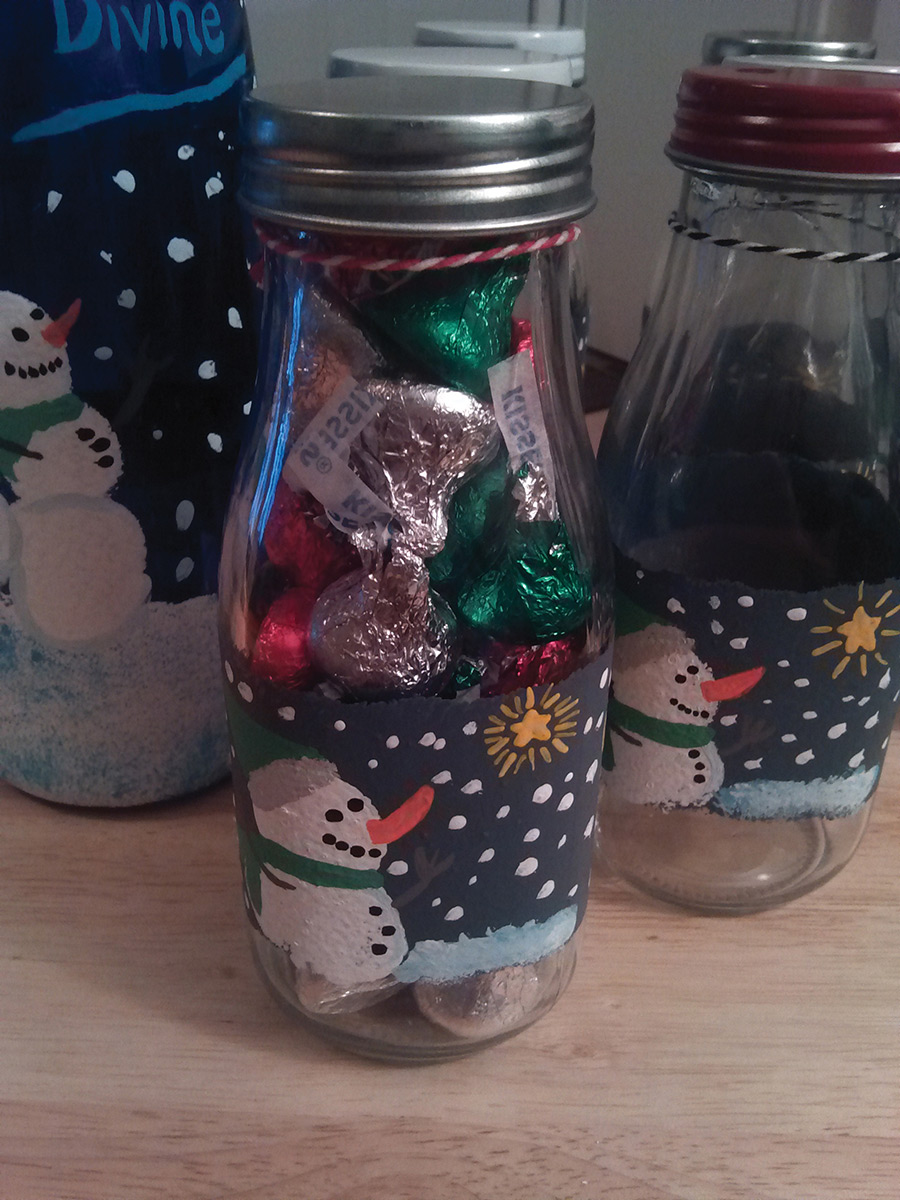
Recycled Bottle Art – Nicole Flood
I enjoy recycling glassware and turning it into my own DIY project.
After emptying a bottle or container, wash it with soap and warm water, removing the adhesive or labels as you go. Rinse the bottle and set it aside to dry.
Using acrylic paint, decide on a design. Wine bottles are great for sharing your favorite quote or creating holiday décor. (They can also double as flower vase.) Recycling frappe bottles and glass milk bottles also makes for a great project or gift. You can fill the bottles with candy, paperclips, or even rubber bands.
After painting and letting it dry, be sure to evenly spray the bottle with a clear, sealing spray paint. This process will protect your design and keep your paint from chipping.
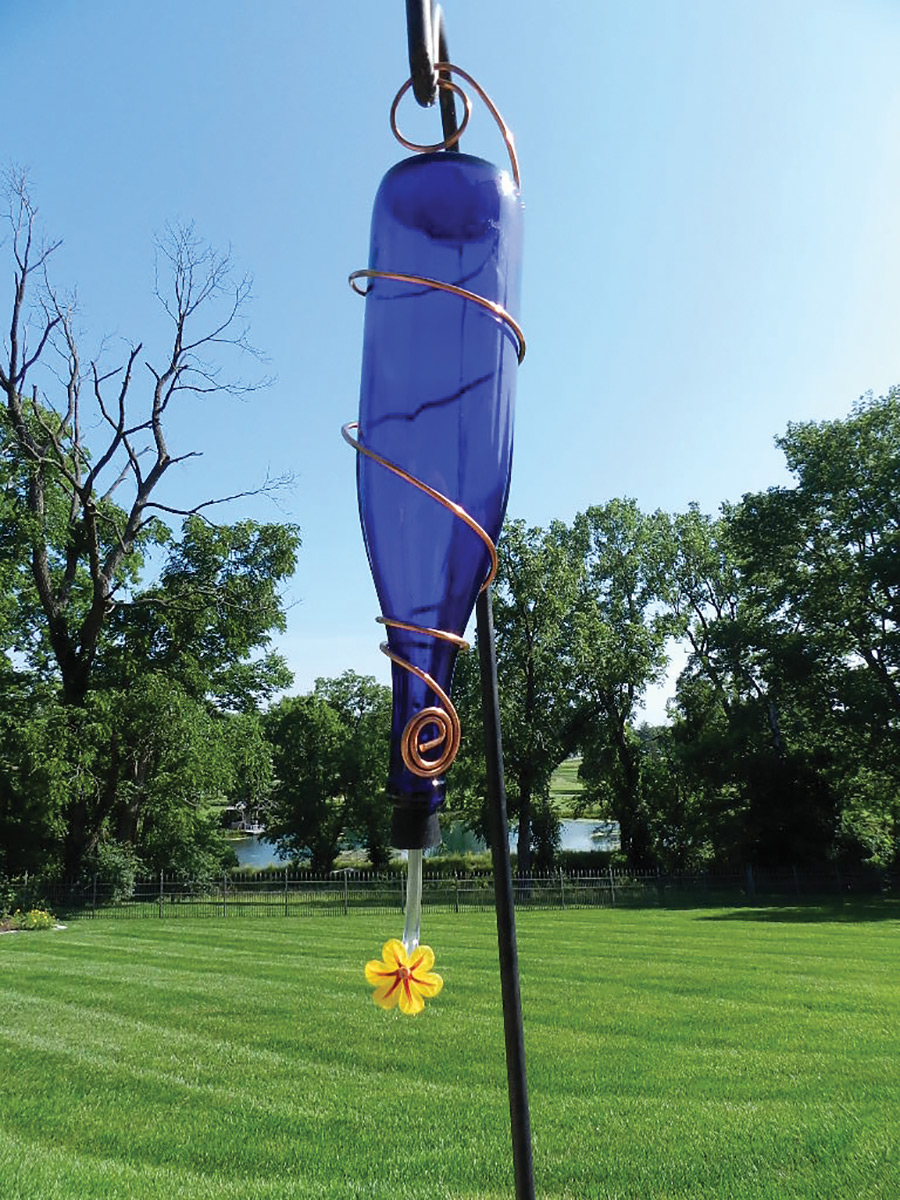
Hummingbird Feeder – Pat Gerke
This hummingbird feeder is an easy DIY that anyone can do with an empty wine bottle. It’s like happy hour for the birds when you hang a few of these in your backyard!
All you need is a 750 milliliter wine bottle, four feet of eight-gauge copper wire, a feeder spout (found on Amazon), and a food recipe.
Using pliers, make a small circular twist at the beginning of the wire. Hold it tight against the wine bottle and begin wrapping the wire around the bottle, leaving about a foot of wire at the top to form the hanger. Twist into a larger circle at the end. The bottle can easily be removed for cleaning and refilling.
Hummingbirds usually start to appear in Missouri this time of year and continue through October. You might want to make several of these, as the little guys will fight over just one!
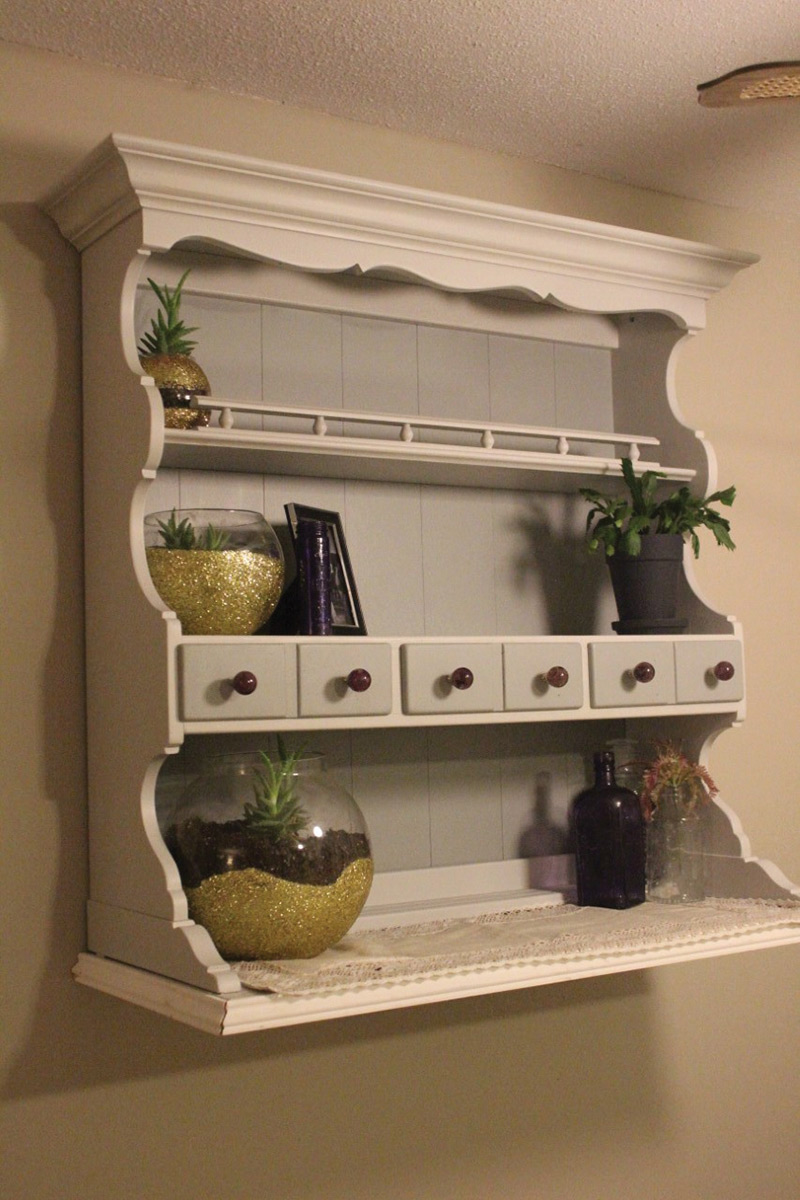
 Upcycled Hutch – Rachel Olson
I inherited this hutch top from a friend who didn’t have time to give it the love it needed. It sat for a while as a cat napping spot until I figured out how to upcycle it.
I added a shelf on the bottom, gave it a fresh coat of paint, switched out the knobs on the drawers, and trimmed it out. I went with neutral and added color in the knobs to complement some retro bottles I picked up in college.
The planters are glass bowls I purchased at Goodwill and coated with layers of glitter and Mod Podge. I filled the bottom with gravel for drainage and planted aloe that I split from my Grandmother’s house.
As a graduate student, I love DIY because it gives me a creative outlet and a chance to work with my hands. It challenges me to learn skills I’d never pick up otherwise, and I love the sense of accomplishment that comes with finishing a piece.